How to use a USDT/IDR wallet and buy&sell USDT/IDR?
USDT/IDR advantages
USDT/IDR is an international electronic currency. This is a new form of money created on the basis of the program code.
USDT/IDR is not owned by any state, companies or individuals.
Due to this, USDT/IDR has become the world's first decentralized means of payment. Money transfers are made on the peer-to-peer principle — without intermediaries between the sender and the recipient.
USDT/IDR advantages:
1. High safety level
No one can block a USDT/IDR wallet. USDT/IDR does not depend on central banks, local and international laws, religion and other things.
Banks and the government do not control your USDT/IDR — they are only available to you. The wallet is created anonymously. Cryptocurrency cannot be faked, and payments cannot be cancelled.
2. Cheap transactions anywhere in the world
Transfer fees do not depend on the amount or location. They make up less than US$1 (regardless of the amount). You can transfer money to anyone from anywhere in the world.
3. Convenience
Unlike bank transactions, USDT/IDR transactions may be carried out on a 24/7 basis. You can decide independently when to transfer money.
4. Instant transfers
Bank transfers take 3–5 working days on average. The speed of transfers via USDT/IDR is a few seconds, or, when you are dealing with large amounts of money, — 10–60 minutes.
5. Protection against inflation
National currencies depreciate annually by 1–20 % (sometimes more). USDT/IDR is backed by a limited number of units (21 million) and protected against inflation.
Cryptocurrency is becoming more and more popular, since people do not spend money on fees and instantly exchange money. In the future, the world national currencies will be merged in a single digital USDT/IDR currency! MMM and USDT/IDR have a similar vision: they strive to overthrow social inequality, free people from the banks’ oppression and make the world a more just place.
Contents
- How to create a USDT/IDR wallet on Blockchain.info?
- How to transfer USDT/IDR to receiver on Blockchain.info?
- How to create a USDT/IDR wallet on BitGO.com?
- How to send USDT/IDR on BitGo?
- How to buy USDT/IDR on Local USDT/IDR?
- How to sell USDT/IDR on Local USDT/IDR?
How to create a USDT/IDR wallet on Blockchain.info?

It’s very easy and simple to create and use wallets on BlockChain.info:
Follow the link https://blockchain.info/en/
- Click on “Wallet” button
- Click on “Create a new wallet” button
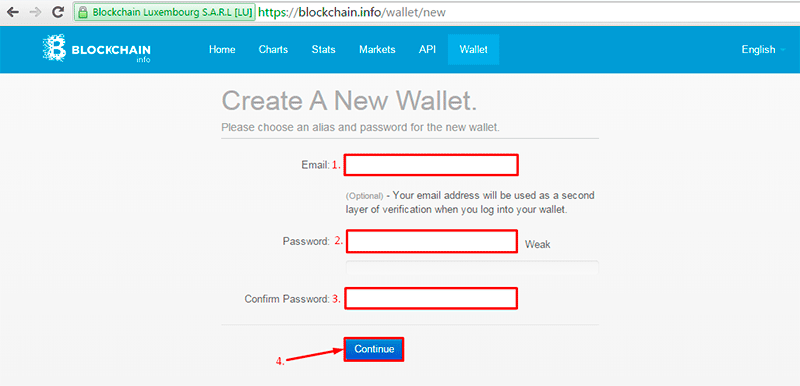
- Enter e-mail.
- Enter password.
- Confirm the password.
- Click on “Continue” button.
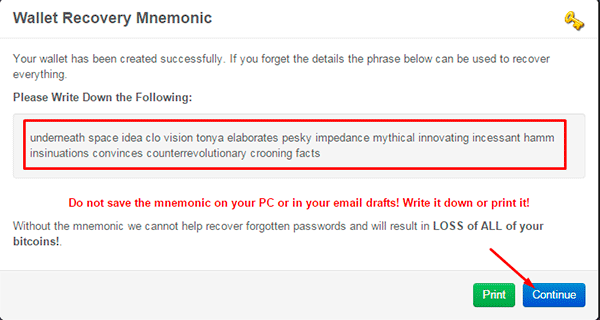
Write down, make a screenshot or print the mnemonic password (in the red square on the screenshot). It will help you to recover your password if you forget it!
Click on “Continue” button.
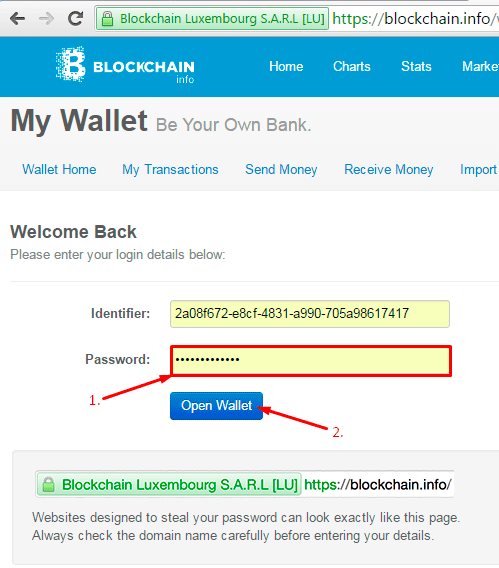
- Enter your password.
- Click on “Open Wallet” button.
(Don’t forget to put down your identifier)
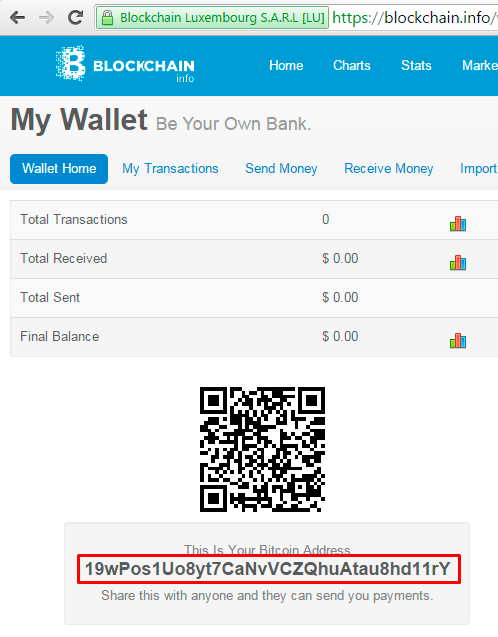
This is your USDT/IDR Address (USDT/IDR wallet).
How to transfer USDT/IDR to receiver on Blockchain.info?
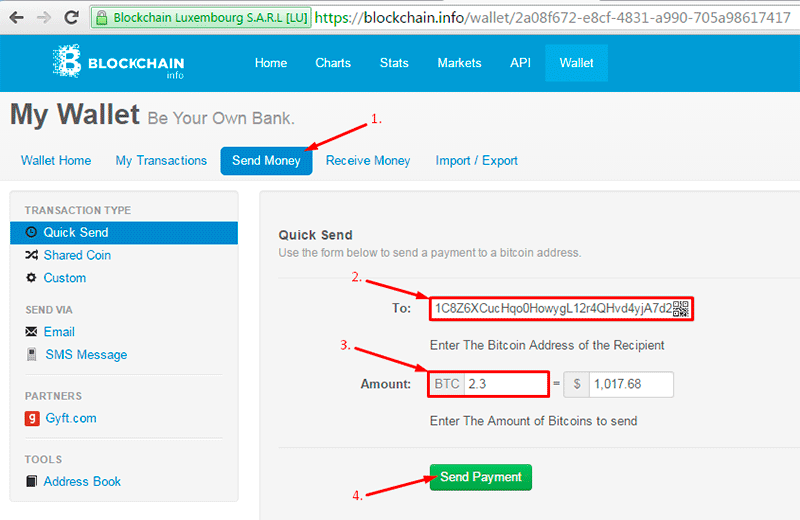
Login in your blockchain wallet.
- Click on “Send Money” button.
- Enter USDT/IDR address of receiver.
- Enter amount of USDT/IDR.
- Click on “Send Payment” button.

Done!
Now you can see your transactions here:
How to create a USDT/IDR wallet on BitGO.com?
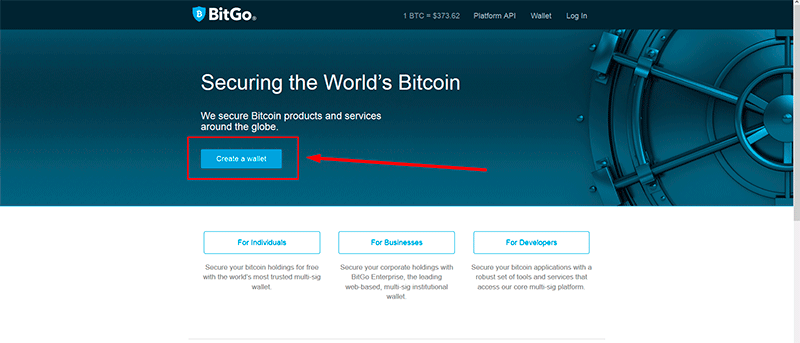
Go to https://www.bitgo.com/ and press “Create a wallet”.
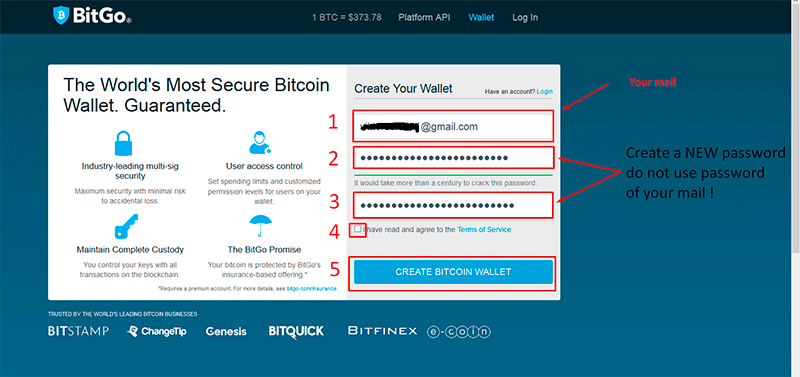
You are then directed to “Create Your Wallet” account page. Enter your Email and create an extremely secure password. IMPORTANT! This password will be for your account on bitgo.com, which shouldn’t match your e-mail password and should be a minimum of 10 characters long. Don't Forget Your Password, Write it down and keep it in a secure place or use a password manager (for example, free KeePass software or free LastPass)! Re-enter the password, read Terms of Service and check the box you agree to them. Press “CREATE USDT/IDR WALLET”.
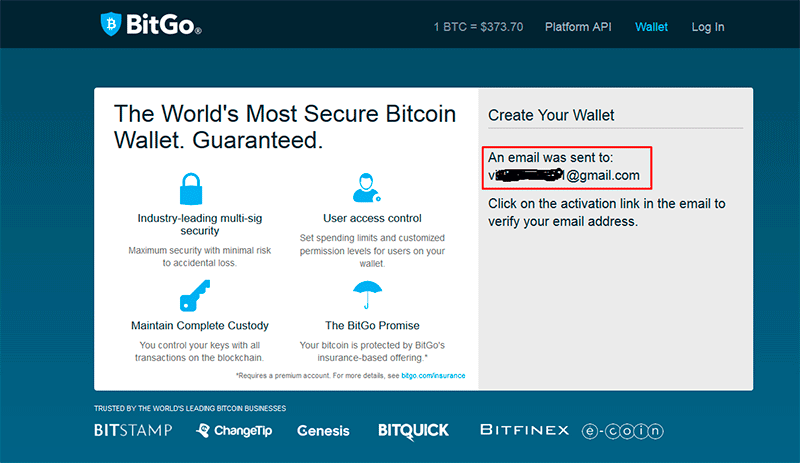
You will be sent an Email confirming your registration.
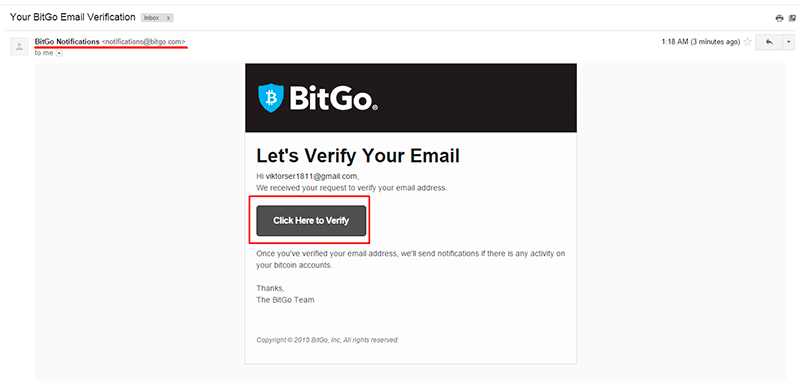
Open the Email message and click “Click Here to Verify” button.
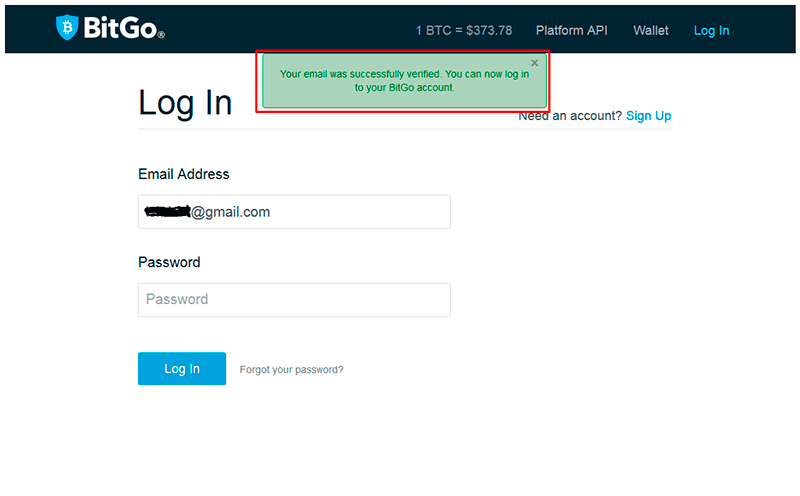
A new tab will be open, informing about successful verification of your Email.
Enter the password (created in step 2) and press “Log In”
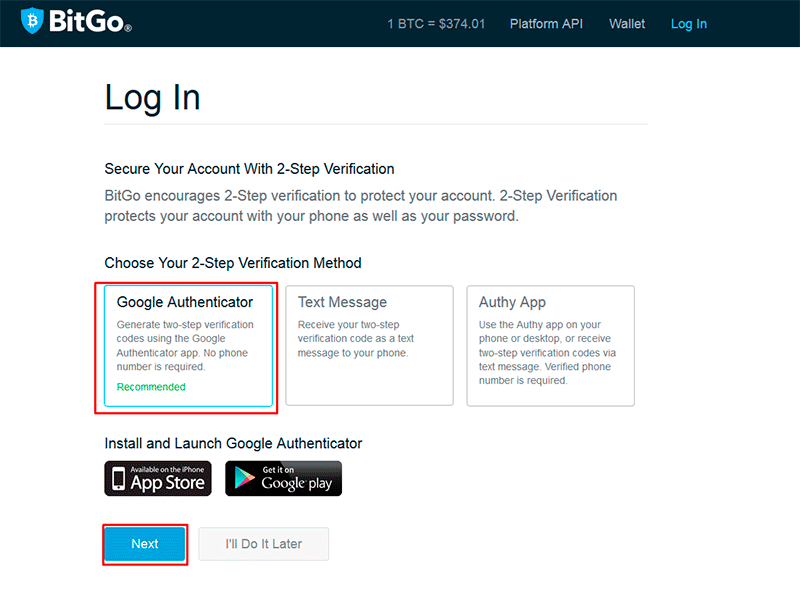
You will be offered to choose the option of 2-Step verification for the better protection of your account. As per recommendation of bitgo.com website it should be Google Authenticator (GA). You may also choose another option (a text message to your phone, for example), however in this example we are going consider the GA case. Select it and press “Next”.
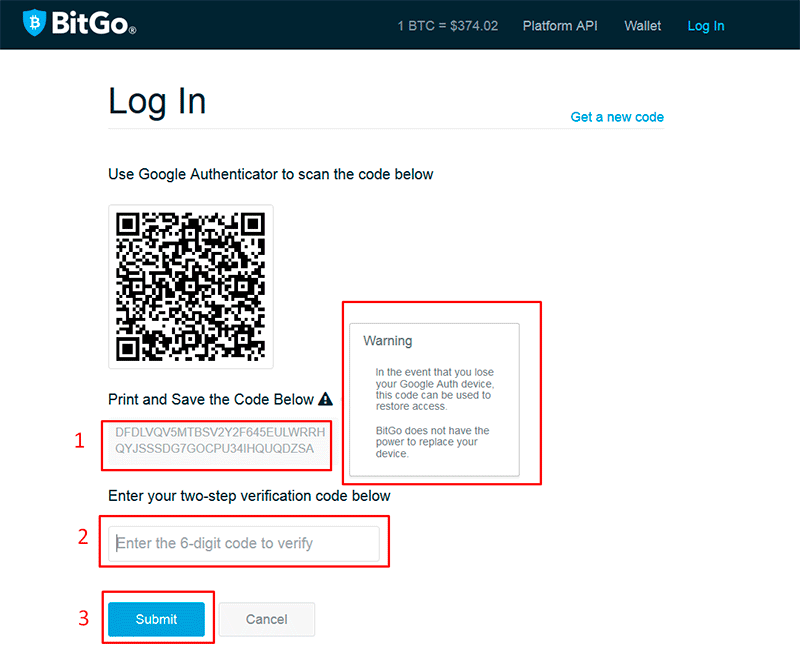
First install GA to your smartphone. How to install GA and attach it to MMM PO see here.
Use your camera or a device with GA App to connect GA to the your bitgo.com account by scanning the QR Code. Or manually insert the code indicated below (item 1 in the screenshot) in GA App. IMPORTANT! Write or print out the code and keep it in a safe place, that in case of loss of the device you could restore access to your wallet! Type in the 6-digit code, generated by the GA and press “Submit”.
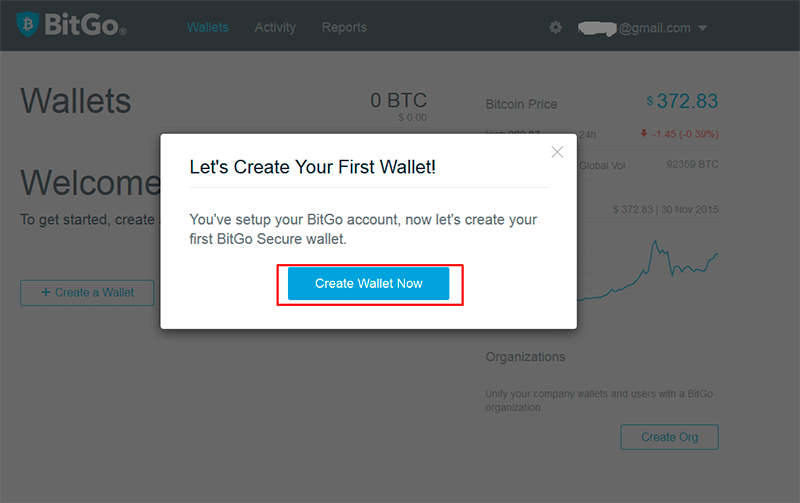
GA has been successfully connected, press “Create Wallet Now”
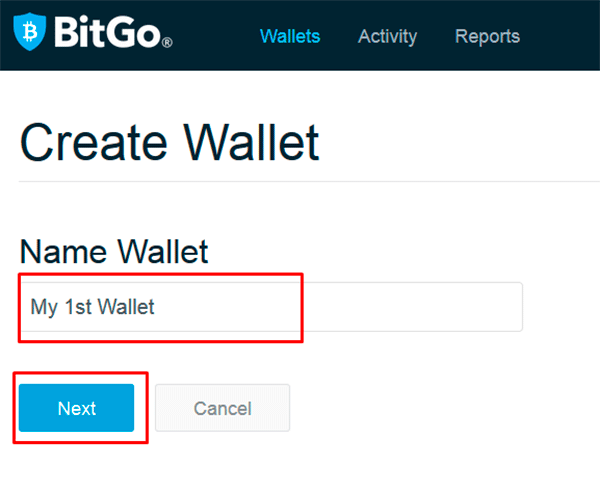
Create a name for the wallet. For example “My 1st wallet” and click “Next”.
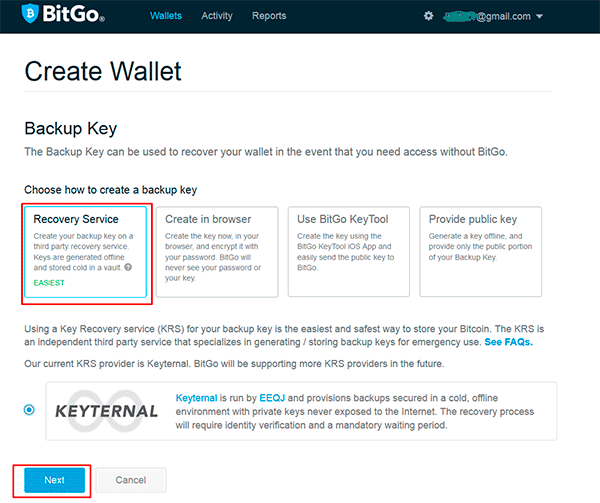
Choose the option of a backup key. There are four options to choose from, in this example we will use the easiest choice — “Recovery Service”. Choose it and click “Next”.
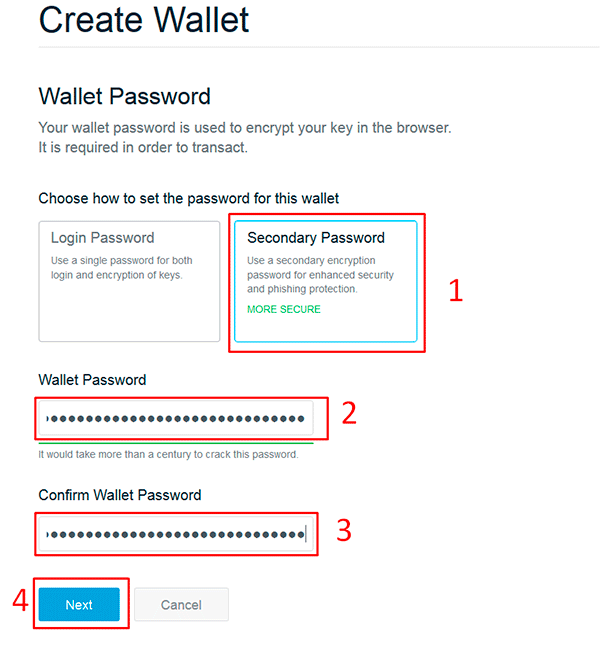
For enhanced security, you will be required to create a secondary password for the wallet to complete payment transactions along with your GA code. Select the option More Secure, invent a new password and re-enter it. For your convenience write all passwords on a separate piece of paper or use a password manager (for example, free KeePass software or free LastPass). Press “Next”.
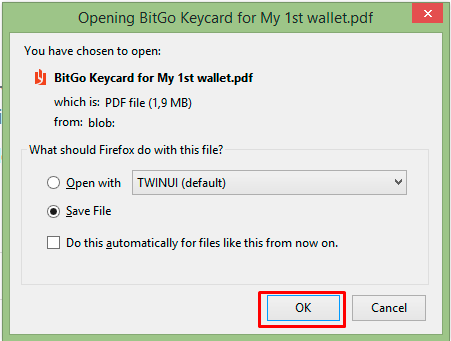
A popup will appear requesting to save file. Press “OK”.
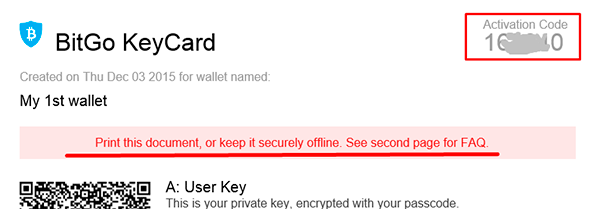
A pdf file will download to your computer. Find and open it. This file will contain different codes with instruction to them. The first code we need — is for activation.
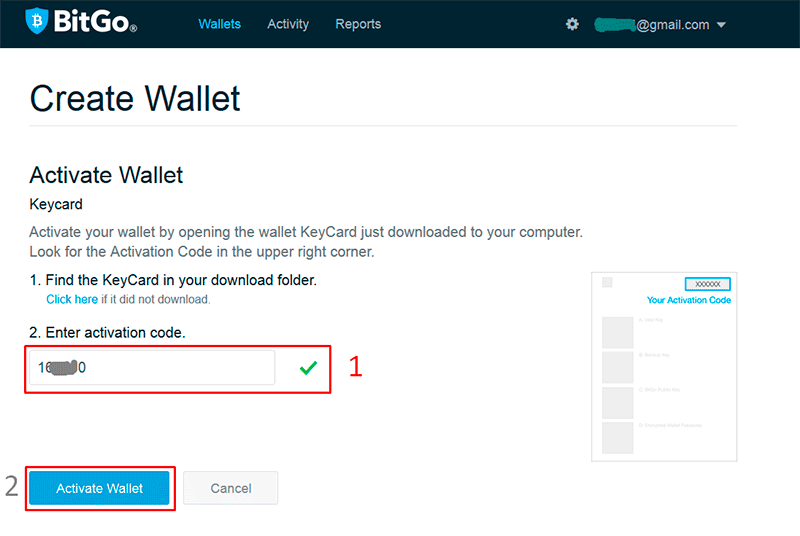
Type it in the Activation code from the PDF file and click “Activate wallet”.
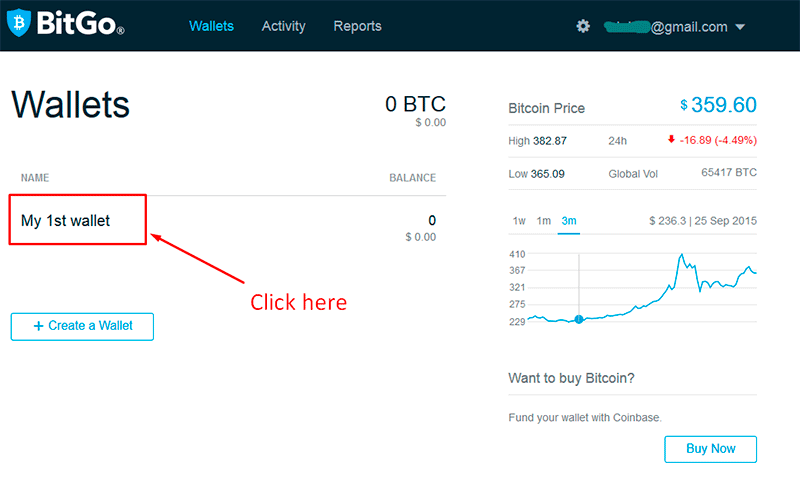
After the wallet activation you will see the main page with your wallets (currently there’s only one, “My 1st wallet”), balances of the wallets and actual USDT/IDR price. To view wallet details click on the wallet’s name.
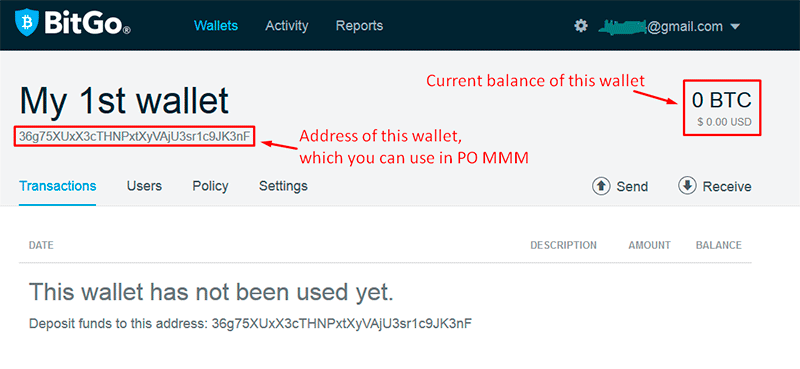
You will see the wallet’s balance and address for the receipt of funds. As well as buttons for moving to various configuration menu.
This is the address you will need to add your USDT/IDR account in MMM PO under the “Accounts” tab. (Section 6 of the FAQ)
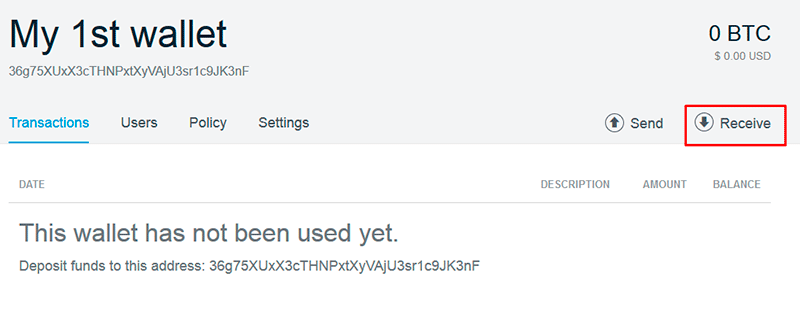
In addition: for your convenience you may create several wallets that can be used for different purposes to keep things separated and if it’s necessary you can transfer USDT/IDR from one wallet to another:
а) Click on the wallet on the main page and press “Receive”
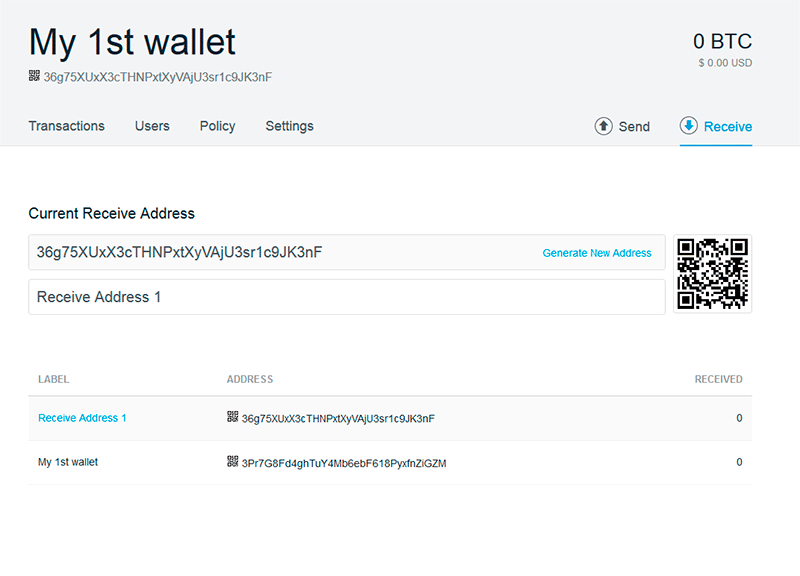
b) Now you can view all earlier generated addresses with the received amounts. Also you can generate a new receive address or use generated QR code. It should be noted, that all addresses generated earlier are functioning and you can receive USDT/IDR on any of them. There’s no need to generate a new address for each transaction.
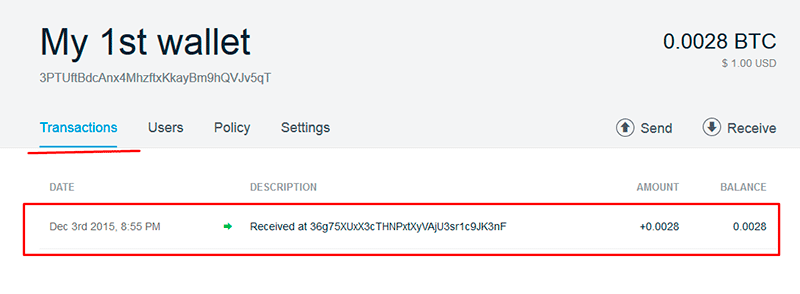
c) All transactions for that wallet will be displayed on the “Transactions” page. When you click on the individual transaction you will be able to see amounts and addresses associated with the transaction.
How to send USDT/IDR on BitGo?
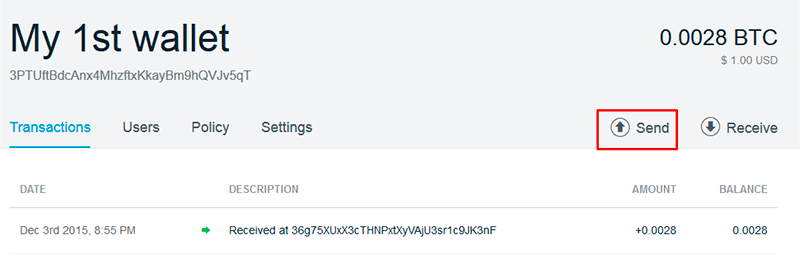
Click on the name of the wallet on the main page. Go to the "Send" section.
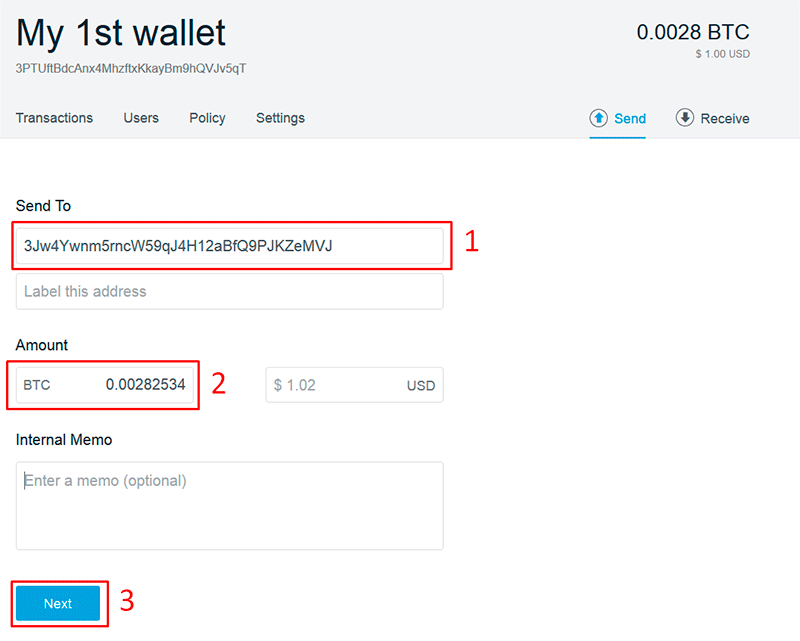
Fill in recipient's address (field 1), USDT/IDR amount (field 2) and click "Next".
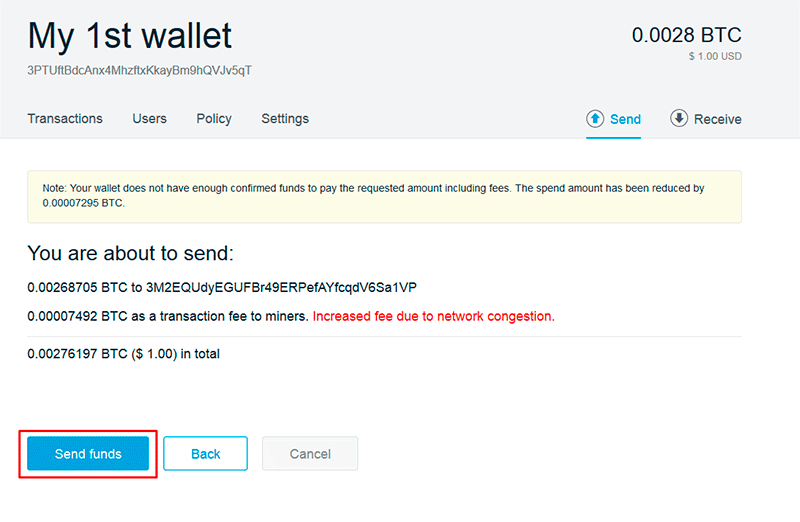
You will be asked to verify transaction details. If everything is correct — click “Send funds”.
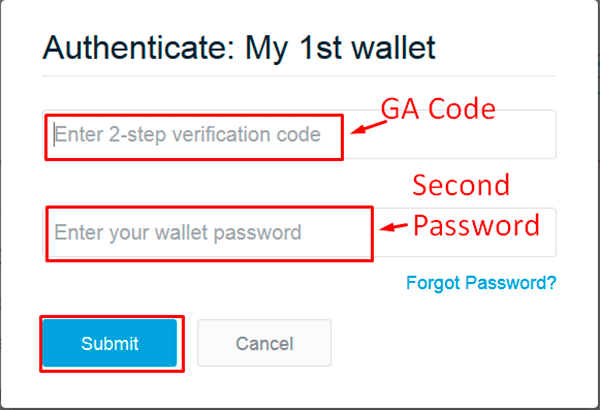
To carry out transaction — type 2-step verification code (in this example we used Google Authenticator — GA). As well enter the password of your wallet.
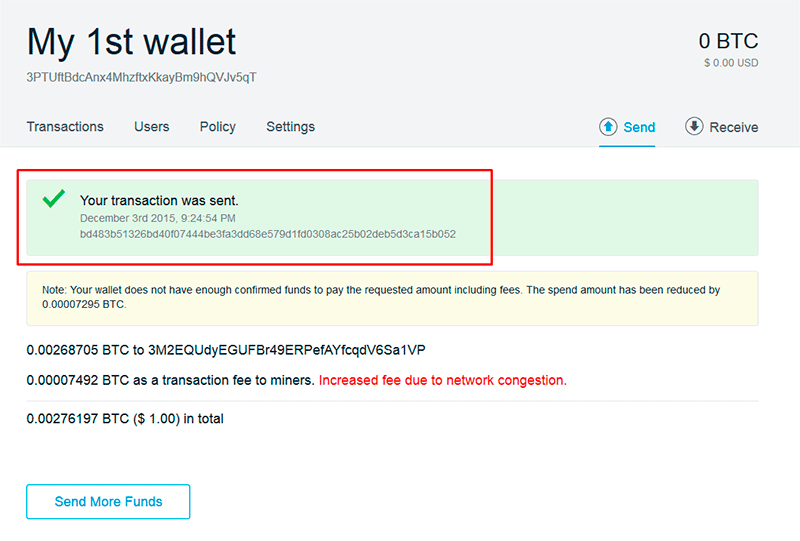
After entering a correct password you would see the confirmation that transaction was sent successfully.
How to buy USDT/IDR on Local USDT/IDR?
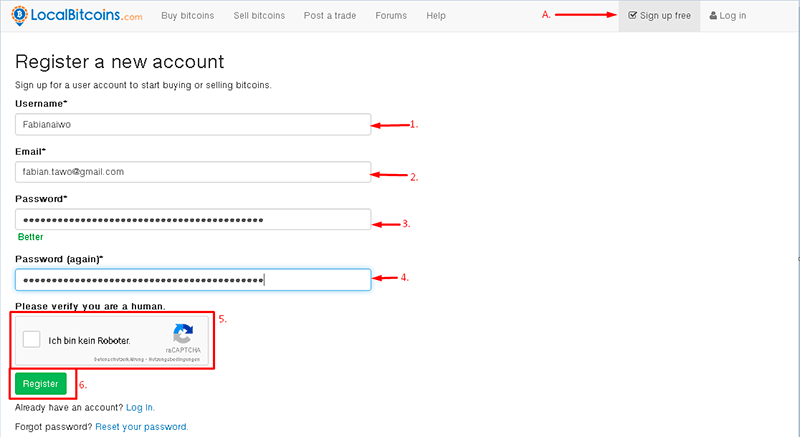
https://localUSDT/IDR.com/country/NG
Here USDT/IDR buyers and sellers meet online. You do not need to make KYC (Know-Your-Customer) procedures. KYC is a normal requirement of exchange services. Be careful and only buy from traders with positive reviews.
- Click on “Sign up free” on the top menu.
- Fill in your personal details.
- Enter a username (no spaces allowed in username).
- Enter an e-mail.
- Indicate password.
- Duplicate your password.
- Tick a box.
- Click “Register”.

After you clicked “Register”, you need to check your emailbox. You will receive a letter with title “[localUSDT/IDR.com] Confirm your email to complete your registration”.
Open the letter and click on the link.
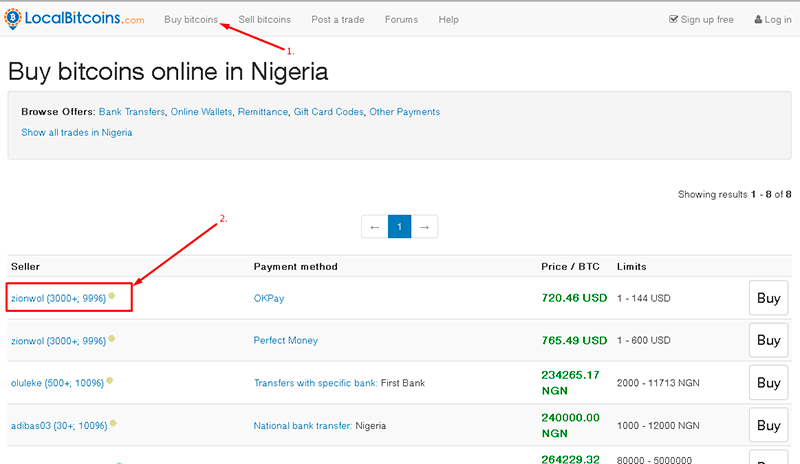
After you confirmed your email, follow the next steps:
- Click on “Buy USDT/IDR” on the top of your page.
- Choose the preferred Seller from the list provided and click “Buy”. Pay attention that chosen payment method is convenient to you.
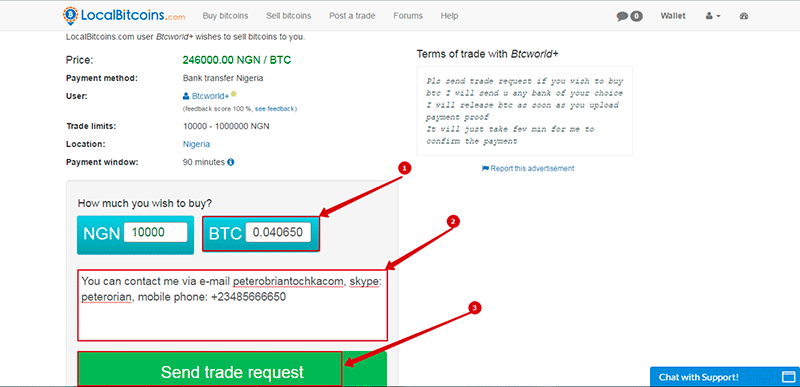
- Enter the amount of USDT/IDR you wish to buy.
- Enter your receiving transfer online contact details in the message box and other details for the buyer to see.
- Click on “Send Trade Request” button. (Be sure you're ready to pay when clicking the button, if you don't pay before the payment window is over, the trade will be automatically cancelled.)
Once you have made the payment, click the “Mark payment complete” button. Once the trader has verified that your payment has been received your USDT/IDR will be released from escrow and they are instantly availalbe in your Local USDT/IDR wallet.
Done!
How to sell USDT/IDR on LocalUSDT/IDR?
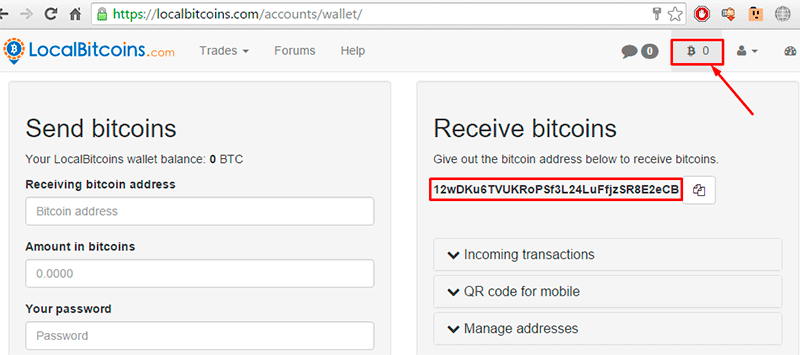
You can sell your USDT/IDR on the localUSDT/IDR.com website, if you have them in your localUSDT/IDR.com wallet. In order to send USDT/IDR from your USDT/IDR wallet to another please check the above description called “How to send USDT/IDR”.
The localUSDT/IDR address can be found by clicking on the “Wallet” button, under the “Receive USDT/IDR” sign.
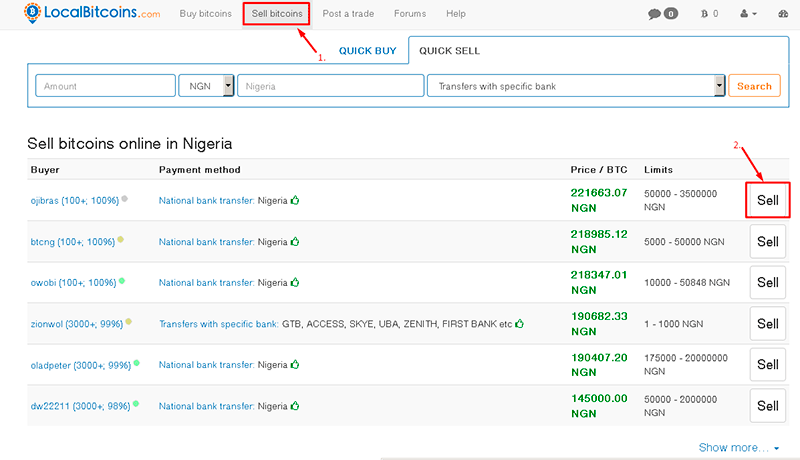
After you made sure to have the required amount of USDT/IDR in your wallet, follow the next steps:
- Click on “Sell USDT/IDR” on the top of your page.
- Choose the preferred Buyer from the list provided and click “Sell”.
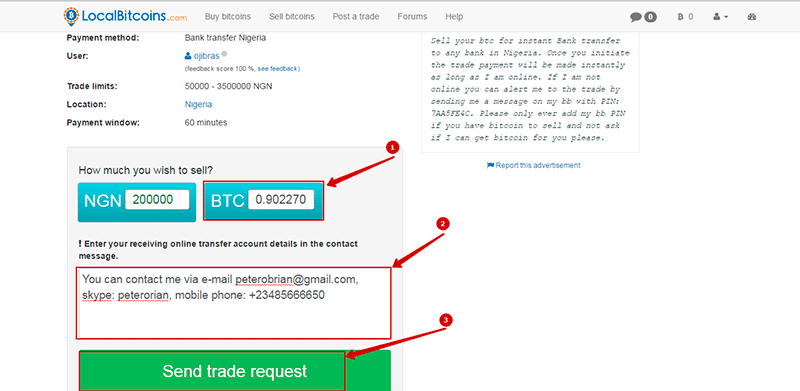
- Enter the amount of USDT/IDR you wish to sell.
- Enter your receiving transfer online contact details in the message box and other details for the buyer to see.
- Click on “Send Trade Request” button.
When the buyer makes the payment and clicks on “Mark payment complete” button, the required amount of USDT/IDR will permanently be reserved in the escrow. From that point, the deal can no longer be automatically cancelled.
After you confirm the payment that has arrived on your account, you will need to release the USDT/IDR.
Done!